Open-source electronic prototyping platform enabling users to create interactive electronic objects.
Based on social mentions, "Arduino AI" seems appreciated for its versatility and ease of use in creative projects, particularly in DIY and automation endeavors. However, there is limited direct feedback on the specific strengths and weaknesses of the software itself, with much of the conversation focused on related projects rather than the tool's capabilities or flaws. Pricing sentiment or overall cost value is not directly addressed, but the use of affordable hardware like the ATtiny85 suggests a potentially budget-friendly perception. Overall, "Arduino AI" appears to have a positive reputation for hobby-focused, inventive applications, though more detailed reviews would be needed to fully assess user satisfaction.
Mentions (30d)
0
Reviews
0
Platforms
2
Sentiment
13%
1 positive

Based on social mentions, "Arduino AI" seems appreciated for its versatility and ease of use in creative projects, particularly in DIY and automation endeavors. However, there is limited direct feedback on the specific strengths and weaknesses of the software itself, with much of the conversation focused on related projects rather than the tool's capabilities or flaws. Pricing sentiment or overall cost value is not directly addressed, but the use of affordable hardware like the ATtiny85 suggests a potentially budget-friendly perception. Overall, "Arduino AI" appears to have a positive reputation for hobby-focused, inventive applications, though more detailed reviews would be needed to fully assess user satisfaction.
Features
Use Cases
Industry
electrical/electronic manufacturing
Employees
570
Funding Stage
Merger / Acquisition
Total Funding
$54.0M
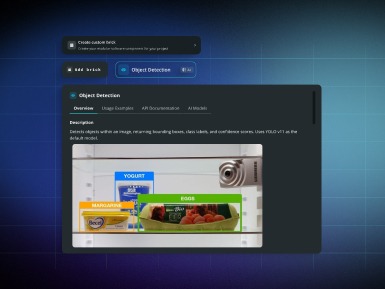
Have you tried making hardware projects with AI? We made it! Free and open source!!
Hey everyone :) We built Exort, an open-source desktop workspace for microcontroller projects with an AI agent built in. Our goal is to make hardware coding easier and more friendly, so people of different ages and experience levels can build their own microcontroller projects without feeling overwhelmed. It’s a desktop app for developing microcontrollers with the help of an AI agent. We used OpenCode as the AI agent, and Exort now supports all Arduino boards. The best part is that it’s totally free to use. Github Repo: https://github.com/Razz19/Exort Your support would really help Exort and us a lot ❤️ And if you’re open to contributing, feel free to connect with me :) submitted by /u/moonlikee [link] [comments]
View originalClaude Code built its own software for a little smart car I'm building.
TLDR: Check out the video # Box to Bot: Building a WiFi-Controlled Robot With Claude Code in One Evening I’m a dentist. A nerdy dentist, but a dentist. I’ve never built a robot before. But on Sunday afternoon, I opened a box of parts with my daughter and one of her friends and started building. Next thing I know, it’s almost midnight, and I’m plugging a microcontroller into my laptop. I asked Claude Code to figure everything out. And it did. It even made a little app that ran on wifi to control the robot from my phone. --- ## The Kit A week ago I ordered the **ACEBOTT QD001 Smart Car Starter Kit.** It’s an ESP32-based robot with Mecanum wheels (the ones that let it drive sideways). It comes with an ultrasonic distance sensor, a servo for panning the sensor head, line-following sensors, and an IR remote. It’s meant for kids aged 10+, but I’m a noob, soooo... whatever, I had a ton of fun! ## What Wasn’t in the Box Batteries. Apparently there are shipping restrictions for lithium ion batteries, so the kit doesn’t include them. If you want to do this yourself make sure to grab yourself the following: - **2x 18650 button-top rechargeable batteries** (3.7V, protected) - **1x CR2025 coin cell** (for the IR remote) - **1x 18650 charger** **A warning from experience:** NEBO brand 18650 batteries have a built-in USB-C charging port on the top cap that adds just enough length to prevent them from fitting in the kit’s battery holder. Get standard protected button-top cells like Nuon. Those worked well. You can get both at Batteries Plus. *One 18650 cell in, one to go. You can see here why the flat head screws were used to mount the power supply instead of the round head screws.* ## Assembly ACEBOTT had all the instructions we needed online. They have YouTube videos, but I just worked with the pdf. For a focused builder, this would probably take around an hour. For a builder with ADHD and a kiddo, it took around four hours. Be sure to pay close attention to the orientation of things. I accidentally assembled one of the Mecanum wheel motors with the stabilizing screws facing the wrong way. I had to take it apart and make sure they wouldn’t get in the way. *This is the right way. Flat heads don’t interfere with the chassis.* *Thought I lost a screw. Turns out the motors have magnets. Found it stuck to the gearbox.* *Tweezers were a lifesaver for routing wires through the channels.* *The start of wiring. Every module plugs in with a 3-pin connector — signal, voltage, ground.* *Couldn’t connect the Dupont wires at first — this connector pin had bent out of position. Had to bend it back carefully.* *Some of the assembly required creative tool angles.* *The ultrasonic sensor bracket. It looks like a cat. This was not planned. It’s now part of the personality.* ## Where Claude Code Jumped In Before I go too much further, I’ll just say that it would have been much easier if I’d given Ash the spec manual from the beginning. You’ll see why later. The kit comes with its own block-programming environment called ACECode, and a phone app for driving the car. You flash their firmware, connect to their app, and drive the car around. But we skipped all of that. Instead, I plugged the ESP32 directly into my laptop (after triple-checking the wiring) and told my locally harnessed Claude Code, we’ll call them Ash from here on out, to inspect the entire build and talk to it. *The ACEBOTT ESP32 Car Shield V1.1. Every pin labeled — but good luck figuring out how the motors work from this alone.* *All the wiring and labeling. What does it all mean? I've started plugging that back in to Claude and Gemini to learn more.* **Step 1: Hello World (5 minutes)** Within a few minutes, Ash wrote a simple sketch that blinked the onboard LED and printed the chip information over serial. It compiled the code, flashed it to the ESP32, and read the response. It did all of this from the CLI, the command-line interface. We didn’t use the Arduino IDE GUI at all. The ESP32 reported back: dual-core processor at 240MHz, 4MB flash, 334KB free memory. Ash got in and flashed one of the blue LED’s to show me it was in and reading the hardware appropriately. NOTE: I wish I’d waited to let my kiddo do more of this with me along the way. I got excited and stayed up to midnight working on it, but I should have waited. I’m going to make sure she’s more in the driver’s seat from here on out. *First sign of life. The blue LED blinking means Ash is in and talking to the hardware.* **Step 2: The Motor Mystery (45 minutes)** This next bit was my favorite because we had to work together to figure it out. Even though Ash was in, they had no good way of knowing which pins correlated with which wheel, nor which command spun the wheel forward or backwards. Ash figured out there were four motors but didn’t know which pins controlled them. The assembly manual listed sensor pins but not motor pins, and ACEBOTT’s website was mostly
View originalI used Claude Code to build a USB dongle that auto-plays Chrome Dino — no drivers, no host software, just a $2 board and two light sensors
I built a small ATtiny85 (Digispark) USB dongle that plays Chrome Dino automatically. It plugs into any PC, shows up as a regular keyboard, and uses two LDR sensors on the monitor to detect obstacles and send jump/duck keystrokes. Video attached. How Claude Code helped The firmware is bare-metal C (avr-gcc, not Arduino), targeting an 8-bit MCU with 8KB flash and 512 bytes of RAM. Claude Code was my primary development partner throughout: Wrote the V-USB HID keyboard stack integration and report descriptor Designed the dual-sensor obstacle classification logic (jump vs duck) through back-and-forth iteration Came up with the pulse-width envelope measurement for speed-adaptive timing — I described the problem (game accelerates, fixed delay breaks), and Claude worked out the approach: measure how long each obstacle takes to pass the sensor, use a rolling minimum filter, and scale the jump delay from that Handled the fork-shaped cactus sprite issue (multiple sub-pulses merged via gap threshold) Wrote the full README, PLAN.md, and Makefile I handled hardware assembly, sensor mounting, LM393 potentiometer calibration, and all physical testing. Codex did a review pass and caught a real bug in the envelope tracking logic (sensor polarity was inverted in four places). What makes this different from other Dino bots USB HID keyboard — no host-side Python or browser extension needed No servo or solenoid pressing the spacebar Dual vertically-stacked sensors: lower for cacti, upper for birds Adaptive timing from obstacle envelope width — stays accurate as game speed increases Total firmware size: 2699 bytes Links Repo: https://github.com/hackboxguy/chrome-dinoplayer Blog: https://prolinix.com/blog/chrome-dino-auto-player/ AI disclosure: Claude Code for firmware development and documentation, Codex for code review. Hardware build, sensor calibration, and testing were done manually. Would love feedback — sensor choice improvements, filtering ideas, or firmware architecture suggestions welcome. submitted by /u/albert007_d [link] [comments]
View originalArduino AI uses a tiered pricing model. Visit their website for current pricing details.
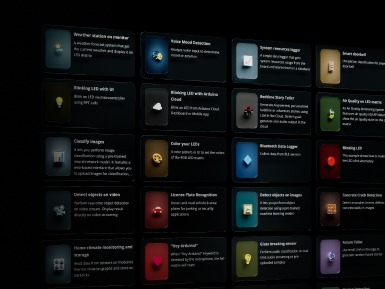
Key features include: Arduino UNO Q: From blink to think, Mission Vision, Learn Arduino.
Arduino AI is commonly used for: Developing smart home automation systems that respond to user commands., Creating interactive art installations that react to environmental stimuli., Building robotics projects that utilize AI for navigation and decision making., Implementing AI-driven sensors for agricultural monitoring and optimization., Designing wearable health monitoring devices that analyze user data., Constructing educational tools for teaching programming and electronics with AI assistance..
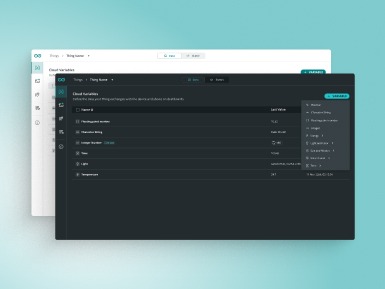
Arduino AI integrates with: Arduino IDE, TensorFlow Lite, Microsoft Azure IoT, Google Cloud AI, IBM Watson, Raspberry Pi, IFTTT, Node-RED, Blynk, Adafruit IO.